From an Arch Trellis to a Cattle Panel Greenhouse
This series of videos shows the transformation of a cattle panel trellis into cold frame and from there into a cattle panel greenhouse.
Cattle Panel Trellises – Great for Growing Veggies
We used our cattle panel trellis for growing tomatoes, cucumbers, squash, beans and winter squash. It’s on a slight slope and while that presented no problem as a trellis, for a greenhouse, especially one with a door, it really needs to be more level.
In these videos we turn a cattle panel arch into temporary plant shelter. Not so pretty but for a quick protective cover from the cold, it works until we can convert to something more substantial.
One of our favorite gadgets for spring and fall gardening is the laser thermometer that you’ll see in the first video. It’s great for quick and accurate readings of greenhouse, plant and soil temperatures, which can be critical for plant protection and planting. We wrote more on that and more, in this article on garden tools.
Cattle Panel Cold Frame – a Temporary Greenhouse
Nope, it’s not a garden ghost, (or tent city), and yes, this cattle panel greenhouse doesn’t look like much yet, but we wanted to show you our rough shod stop-gap version using frost cover first. If you’re like us and you need a quick short term solution to protect your plants from the cold and frost, then this is a shortcut to that.
Next, we’re morphing this into a polyethylene wrapped cattle panel greenhouse with a door and window. We didn’t get our panels leveled and wrapped before the temps dropped below 45 degrees. So, to buy a little time, we created a simple temporary greenhouse.

Garden Archway Transformation
This is the caterpillar that will become a butterfly story. This cattle panel served as a growing trellis for garden veggies in summer, has morphed to a cold frame for early fall and will soon turn into a greenhouse to serve our plants through fall and winter.
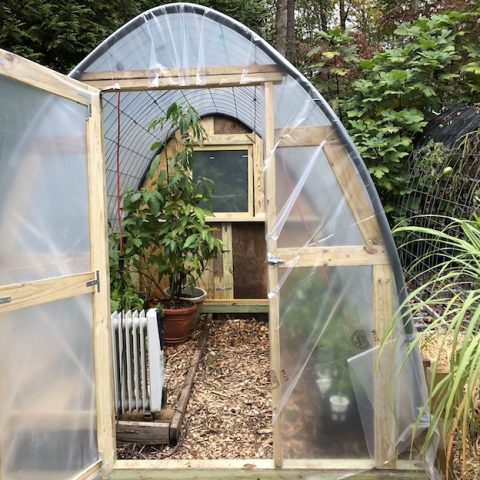
Cattle Panel Greenhouse – A Quick Fix Solution That Works and Lasts
This temporary shelter allows us to work with the warmth-loving longevity spinach (AKA Gynura procumbens). We were able to keep the plant at 50 degrees or higher without additional heating during the October low 40’s cold spell in USDA grow zone 7a. And throughout the winter with two space heaters.
We used 2 space heaters for our 102″L x 72″W x 75″H wide cattle panel greenhouse all winter and it worked fine. On many of the warmer days we not only turned off the heaters altogether but we sometimes needed to open up a window or door or both to keep it from overheating.
2 Space Heaters for 51 sq. ft. Greenhouse
It’s wonderful having ready access to leafy greens during the winter now, and also a larger area to get seeds planted and seedlings nurtured and protected. We trimmed back our longevity spinach in the fall, dried the leaves for tea and homemade greens powders and used many of the clippings to start new plants growing throughout the winter in the greenhouse.
We were also growing microgreens in the cattle panel greenhouse. Once they were ready for harvesting, we moved them to our kitchen window for handing daily clipping as needed.
Cattle Panel Greenhouse Plans
To level up the wire panel we’re going to build up wall supports at the lower end. You can see the sketch of our cattle panel greenhouse plans below. Then we can add an end wall with an entry at front and an end wall at the back with a window.
Sketch for Leveling Greenhouse Floor

Materials and Equipment for Cattle Panel Greenhouse
- Row cover frost cloth and plant blanket
- 6 mil 4 year UV resistant greenhouse polyethylene
- Oil-filled electric radiator-style heater
- Laser thermometer
- 16 ft x 50 inch cattle panels – see our first setup in this article
- Portable Propane Heater – we used two of these to keep the plants from freezing when our power went out, and that did the trick for this sized greenhouse with outside temps in high 20’s to low 30’s degrees Fahrenheit, keeping our greenhouse up to 67°F.
We’ll also replace the temporary cover with 6 mil 4 year UV resistant greenhouse polyethylene. Once sealed, the task is keeping the temps above 50 degrees but not letting the daytime solar heat get out of hand.
The temporary greenhouse with the frost cloth and one oil-filled radiator style electric heater ran at 10 degrees warmer than outside. We’ll install a second heater to elevate that as it gets colder.
For warmer days, venting can be as simple as opening the front door and back window of the greenhouse.
While this isn’t exactly the ultimate dream house greenhouse. We’re very excited to begin with this “starter” model.
Many in our audience are already ahead of us with fantastic greenhouses. But for those who don’t have the space or income to invest in a larger greenhouse set up, this may be helpful.
For us, this is definitely an improvement over our indoor greenhouse, however that’s still great for starting seeds, nurturing seedlings and also for curing potatoes.
Cattle Panel Greenhouse Construction – Part 2
We begin to size up the project and the importance of keeping the same location. To make the door and end panels work we need to level the structure on a slope. The plan is to construct channels for the cattle panels and jack up the lower ends.
Cattle Panel Greenhouse – Part 3
The leveling back to front and side to side is a challenge. Note on the left side, the entire bottom frame is moved to the outside of the blocks. The original 2 X 4 trough didn’t work. This move created a 12 inch wider footprint and puts the heat-retaining cinder blocks into the structure.
Cattle Panel Greenhouse – Part 4
End caps are nearly done as the cattle panel frame is readied for a quality poly cover. The “renovation” is nearing completion.
Cattle Panel Greenhouse – Part 5
Just a few more steps and we’ll be done! The structure is now “dried in” as builders say. Then the interior can be customized with shelves for plants and storage.
Cattle Panel Greenhouse
Cost to Build a 7’x8′ Cattle Panel Greenhouse: $250 @ $4.50/sq ft:
- Cattle panels – $22 each x 2 @ $44
- UV Greenhouse Poly (25’x14′) @ $55
- Leveling material (lumber, fasteners, etc) @ $125
The panels cost about $22 each and the UV greenhouse poly (25′ x 14′) about $55. That’s $100 prior to whatever materials structures like end panels and fasteners.
We had more expenses due to needing to lift the front off the sloping terrain. So about $125 more. Still for less than $250, we got a 7 x 8.5′ foot greenhouse at roughly $4.50/sq foot.
It would’ve been cheaper if we’d used 3 cattle panels because the expense is the same for building the end structures. We just don’t have the room to expand. Also much easier to do so on a flat/level surface.
You can build a 7’x 8′ cattle panel greenhouse starting at ~$150.
~GardensAll.com

Cattle Panel Greenhouse Temperatures
Yesterday and this morning our outdoor thermometer read 31℉ at 8:30 AM. The new DIY greenhouse kept temps about 45℉ yesterday.
We’re aiming for 50℉ and it’s awesome to see the improvement from just a few tweaks.
Temperature Tweaks – Tips for Adding Solar Heat in a Cattle Panel Greenhouse
- Added a dark colored rain water barrel full of water
- Painted a few cinderblocks black.
You can read more about wooden vs plastic rain barrels here.
It Worked!
This morning the outside temp was again 31℉, however the inside temperature was up to 50℉! Yay! Mission accomplished! Naturally, we’ll need to keep a close eye on temperatures on colder days, but we’re optimistic that this is going to work out fine.

Wishing you great gardens and happy harvests!
G. Coleman Alderson is an entrepreneur, land manager, investor, gardener, and author of the novel, Mountain Whispers: Days Without Sun. Coleman holds an MS from Penn State where his thesis centered on horticulture, park planning, design, and maintenance. He’s a member of the Phi Kappa Phi Honor Society and a licensed building contractor for 27 years. “But nothing surpasses my 40 years of lessons from the field and garden. And in the garden, as in life, it’s always interesting because those lessons never end!” Coleman Alderson