
The beauty of nature often inspires us to become creators ourselves. More and more people today are interested in gardening and growing plants and trees. Nature in her abundance, makes it easy to propagate. In this article we cover the best methods for how to plant a tree from a tree.
There’s something undeniably magical about planting a tree and watching it grow over the years, knowing that it could potentially outlive us and provide benefits for generations to come. Even more remarkable is the concept of planting a tree from another tree — essentially creating a new life from one that already exists.
In this article, we delve into the comprehensive process of propagating trees: from choosing the right species to the planting techniques and long-term care.
HOW TO PLANT A TREE FROM A TREE
Step 1: Tree Propagation
While there are commonalities, trees propagate in different ways. Some grow from seeds (sexual reproduction), while others can be propagated from cuttings, layering, or grafting (asexual reproduction).
The method you choose will depend on the type of tree you wish to plant and your desired timeline for growth. For example, growing a tree from seed can be a rewarding process, but it often requires more time and patience compared to other methods.
Step 2: Choosing the Right Tree
When selecting a tree to propagate, consider your local climate, soil conditions, and the ecological impact of the species. Native trees are often the best choice as they support local wildlife and are adapted to the regional climate. Additionally, be mindful of the parent tree’s health; it should be free of diseases and pests to ensure healthy propagation.
Step 3: Methods of Propagation – 4 Ways to Grow a Tree from a Tree
1. SEEDS: Planting Trees from Seeds
If you’re propagating a tree from seed, you’ll need to collect seeds from the parent tree. This typically involves harvesting ripe fruit and extracting the seeds, or collecting seeds directly from the tree when they’re ready to be dispersed.
Some seeds require a process called stratification, where they are exposed to cold temperatures for a certain period to simulate winter. This breaks the seed dormancy and promotes germination. It’s such a beautiful process of nature that occurs in winter so that new trees are birthed to spring forth in spring.
Just remember that not all seeds grow true to the plant, especially cultivated varieties and grafts on special breeds on root stock.
2. CUTTINGS: How to Grow a Tree from a Branch Cutting
Tree cuttings involve removing a section of a branch (preferably with new growth) and encouraging it to take root. This method works well for many deciduous trees and some conifers.
Cuttings should be taken in the dormant season and placed in a growing medium with high humidity until they develop roots.
3. LAYERING: Encouraging Branches to Take Root
There are two main ways to grow a tree from a tree using the layering technique: Air Layering and Ground Layering, both of which we cover below here.
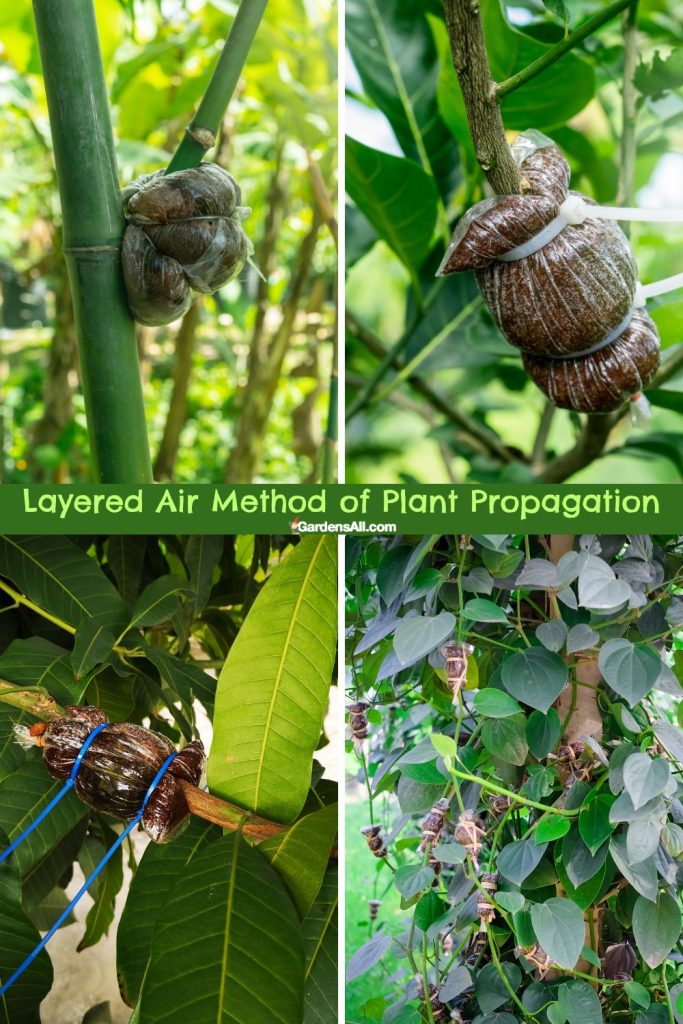
Air Layering Method of Tree Propagation
Air layering is a propagation method that stimulates root growth from a branch while it’s still attached to the parent tree, eventually allowing it to become a new plant entirely. This technique is especially useful for trees and shrubs that don’t root well from cuttings. Here’s how to do it:
- Select a Branch:
- Choose a healthy, mature branch that’s about the thickness of a pencil. Avoid branches with signs of disease or pest infestation.
- Prepare the Branch:
- Make an upward 1- to 2-inch cut through the bark and slightly into the wood, approximately a foot away from the branch tip. This wound will stimulate the growth of new roots.
- Prop the cut open with a small piece of clean wood or a toothpick to prevent it from healing, as this open wound will stimulate root growth.
- Encourage Root Growth:
- Surround the cut area with a handful of moist sphagnum moss, ensuring it’s thoroughly wet.
- Wrap the moss with plastic wrap, creating a ball shape, and secure it in place with twine or strong tape. This creates a humid environment conducive to root development.
- Monitor Progress:
- Keep an eye on the moisture level of the moss, and ensure it doesn’t dry out. It should remain damp but not waterlogged.
- After a few weeks or months, depending on the species, roots should begin to form inside the moss. You can check for root growth by looking for roots pressing against the plastic wrap.
- Sever and Transplant:
- Once you see a healthy system of roots, it’s time to remove the new plant from the parent branch. Cut the rooted section below the new root ball.
- Remove the plastic wrap and gently plant the new rooted cutting in a container with potting soil, or transplant it directly into the ground.
Air layering is a more advanced propagation technique compared to others like cuttings or ground layering, but it can be highly effective, especially for certain species of trees and shrubs. It allows for the propagation of a larger specimen and usually has a higher success rate since the offshoot remains attached to the parent plant until it has produced its own roots.
Video on Air Layering Method of Tree Propagation
Here’s a video example of one method of air layering.
Ground Layering Method of Tree Propagation
Ground layering involves bending a low branch or shoot downwards towards the soil to encourage the formation of adventitious roots at a point along the stem. Once the stem has produced sufficient roots, it’s severed from the parent plant and transplanted as a new individual. The steps are typically as follows:
- Select a Branch: Choose a healthy, flexible branch that can be bent down to the soil level, or that’s already on or near the ground, such as tends to occur with bushes. The branch should be vigorous and free of disease or pests.
- Prepare the Branch: Make a shallow cut, notch or scrape up the bark on the underside of the branch where it will come into contact with the soil. This will help stimulate root formation. Some gardeners also remove a ring of bark or use a rooting hormone on the wound to further encourage rooting.
- Secure the Branch: Bend the branch down to the soil, and bury the wounded section in the ground. It’s important that this part of the branch has good contact with moist soil. You can use a landscape “staple”, a piece of wire shaped like a hairpin, or a heavy rock to keep the branch in place.
- Wait for Root Development: Keep the soil moist and wait for roots to develop at the wound site. This process may take a season or more, depending on the plant species.
- Sever and Transplant: Once the branch has developed a robust root system, cut it from the parent plant and carefully dig it up, minimizing root disturbance. It’s now ready to be transplanted to a new location. Or, if creating a hedge, leave in place and continue this propagation process until you have the hedge as long as you want it.
Ground layering is particularly effective for propagating plants that have branches close to the ground and is commonly used for many types of shrubs, climbers, and trees that don’t root easily from cuttings. It’s a natural form of propagation that often occurs without any human intervention, especially in species with trailing branches.

Video on Ground Layering Method of Tree Propagation
If you’re propagating for creating a lengthy hedge, you’ll want to use multiple propagation methods in addition to ground layers in order to cover more ground more quickly.
4. TWIGS: Propagating Plants from Twigs Cuttings
One of the simplest methods for propagating new trees is through cuttings taken from an existing tree. This method involves cutting healthy twigs or branches from the parent tree and encouraging them to take root independently. Here’s how to do it:
- Select the Right Twig:
- Time of Year: The best time to take cuttings depends on the tree species. For many deciduous trees, winter or early spring is ideal, while for evergreen trees, late spring to early summer might be more appropriate.
- Characteristics: Look for healthy, disease-free branches. New growth is often best, but some species root well from more mature wood. A typical cutting is 6 to 10 inches long.
- Prepare the Cutting:
- Cut: Use sharp, clean pruning shears or a knife to cut the twig at a 45-degree angle. This increases the surface area for roots to develop and reduces the risk of water pooling and causing rot.
- Leaves: Remove the leaves from the lower half of the cutting to reduce water loss through transpiration.
- Encourage Root Growth:
- Rooting Hormone: Dip the cut end of the twig in a rooting hormone powder to encourage root development.
- Planting: Insert the twig into a pot filled with a moist, soilless potting mix, such as peat moss or perlite, which are good for root development. Plant it deep enough to support the twig, usually about a third of its length.
- Create the Right Environment:
- Humidity: Cuttings need high humidity to root successfully. Cover the pot with a clear plastic bag or a plastic bottle cut in half to create a greenhouse effect.
- Light: Place the pot in indirect sunlight. Too much heat or direct sun can cause the cutting to dry out or overheat.
- Water: Keep the soil consistently moist but not soggy. Overwatering can cause the cutting to rot.
- Check for Root Development:
- After several weeks, gently tug on the cutting. Resistance indicates root development. Some cuttings may take several months to root, depending on the species.
- Once the cutting has rooted, gradually acclimate it to less humid conditions by removing the plastic for increasing periods each day.
- Transplanting:
- When the cutting has developed a robust root system, it’s ready to be transplanted into a larger pot or directly into the ground, depending on the season and the tree species.
By following these steps, you can propagate a new tree that’s genetically identical to the parent tree, preserving its characteristics and beauty for another generation.
Video on Propagating Trees from Twigs
5. GRAFTING: Surgical Incision Method
Grafting is the most preferred method of propagation by horticulturists. This method combines the tissues of two plants so they grow together. Grafting is commonly used to propagate fruit trees, allowing growers to combine the best traits of two different trees.
See the best time to plant fruit trees.
Step 4: Planting Your New Tree
Once your tree is ready to be planted (either the seed has germinated, or the cutting, layer, or graft has taken root), select a suitable location. Ensure it has enough space to grow both above and below ground and is appropriate for its sunlight and water needs. The planting hole should be twice the width of the root ball but only as deep. Place your tree in the hole, backfill the soil, and water it thoroughly.
Step 5: Ongoing Care and Maintenance
After planting, your new tree will require consistent care, especially in its early years. This includes:
- Watering: Young trees need regular watering to establish their root systems. The soil should be moist but not waterlogged.
- Mulching: Apply a layer of mulch around the base of the tree to retain moisture, regulate soil temperature, and reduce weed competition.
See also calculating mulch and free sources we use. - Pruning: Regular pruning helps to maintain the tree’s shape, remove damaged or diseased branches, and encourage healthy growth.
- Protection: Guard against pests and diseases by regularly inspecting your tree and applying organic or chemical treatments as necessary.
See also, espalier fruit trees. And… did you know that there are many edible tree leaves?
These are all important steps, however, we have lost more trees to deer than any other cause. See best natural deer deterrents.
In Summary
Planting a tree from another tree can be an addicting experience, especially for plant lovers who thrive on seeing things grow! Beyond that, planting trees and gardens isn’t just good for the soul… it’s good for the planet!
Remember, the effort you invest today will blossom into a legacy that could potentially last for centuries.
You may also enjoy this article on how to grow fig trees. We love harvesting some of the abundant leaves for some of the many fig leaves tea health benefits, plus it’s a tasty tea!
Happy planting!
I’m LeAura Alderson, a garden, herb and plant enthusiast with a passion for discovering the many edible and medicinal benefits of the plants all around us, including the weeds, while transforming the land through regenerative permaculture practice. I am also a writer, editor and media publisher (now mostly retired due to replacement by AI), but which now allows more time to build our regenerative permaculture homestead farm.