
Season before last we lost a number of garden crops to deer, squirrels, opossums and raccoons. So last year we installed this small electric garden fence kit by Hooyman. It worked, so this season, 2023, we’ve expanded it.
Why an Electric Fence?
Well, do you know how high deer can jump? It’s really high, so other non-electrified fences have to be really tall to keep the deer out. That’s means, more expensive, and if you go for the aesthetics of solid fencing, then a large part of the view (from the outside in and the inside out), and some of the sunlight is blocked.
We like the open view and low profiled of the solar electric fence system, and…. it’s working!
Benefits of an Electric Garden Fence System Kit
An electric garden fence kit is a great way to keep unwanted pests out of your garden. It can be especially effective for keeping out small animals like rabbits, squirrels, and other critters that can damage your plants.
The advantage of an electric fence kit is that (hopefully) it contains all the pieces you need in addition to instructions. If you’re great with engineering and DIY projects, then you may be game to create your own from scratch.
While I’m a retired building contractor, so decent at building and figuring things, I’ve been out of the field for longer than I was in it, so I’m a bit rusty. Given that plus wanting to save on time, since I’m busy in new endeavors, I will often choose a kit as a way of learning the ropes with all the right pieces and instructions.
In my experience, once you learn the basics of a system through a kit, then it’s easier to innovate and adapt from there. That’s what I did with our drip irrigation kit; bought a kit and set it up, then having that framework and template on how it works, I continued to add and expand to it.
Now, we’ve done that with our electric garden fence. This next image is the first one we set up, followed by the updated and expanded version.
Our First Small Electric Fence Setup
We have a small garden space and this was our first experimental setup.

Our Second Electric Fence System is Expanded and Refreshed
In this next image, you can see that we’ve expanded our garden space a little with the addition of galvanized metal raised garden beds.
This is still a relatively small garden space, at our vacation rental property investment, which will be our future homestead. Since we’re not yet here full time, we’re expanding slowly so that we can manage it, and to make sure the crops survive without decimation by garden pests.
On this updated look, we upgraded the rusty fence posts by covering them with painted PVC pipes.

Benefits of an Electric Fence
When choosing an electric garden fence kit, you will typically have two options: with or without a solar charger, and we cover both in this article, but first, what are some of the benefits of an electric garden fence?
7 Electric Fence Benefits
- Cost-effective: Electric garden fences are often more cost-effective than traditional fencing options. They require fewer materials and labor to install and are often more affordable to maintain over time.
- Easy to install: Many electric fence kits come with everything you need to install the fence yourself. They typically include the fence wire, fence posts, grounding system, and fence controller. This makes installation relatively easy, even for those with limited DIY experience.
- Environmentally friendly: Solar-powered electric garden fences use renewable energy from the sun, making them an eco-friendly choice for protecting your garden.
- Low maintenance: Once installed, electric garden fences require very little maintenance. They don’t need to be painted or stained, and the only regular maintenance required is to check the battery or power supply and replace it as needed.
- Low profile: An electric fence it typically low profile in that it’s only a few horizontal wires that don’t block the view, airflow or sunlight from the garden.
- Protection: An electric garden fence can help protect your garden from unwanted pests such as rabbits, squirrels, raccoons, and deer. These animals can cause significant damage to your plants and crops, and an electric fence can be an effective way to keep them out.
- Versatility: Electric garden fences are available in a variety of sizes and can be customized to fit your specific needs. They can be used to protect small garden plots or larger agricultural areas.
Overall, an electric garden fence is a great investment for anyone looking to protect their garden from unwanted pests.
Tips on Building and Maintaining an Electric Fence
No matter whether you go with solar or electric or a combination, here are some tips that are relevant to any electrified fence system of this sort that uses wire, cord or tape methods.
- Warning Sign: For safety of others, (and depending on your circumstances),
- Kits Benefits: To go with a small electric garden fence kit will save time in helping you in learning how it works and how to set it up.
- Expansion: After your initial fence is set up, you can then more easily buy parts to piece together your own additions, or you can go with another kit.
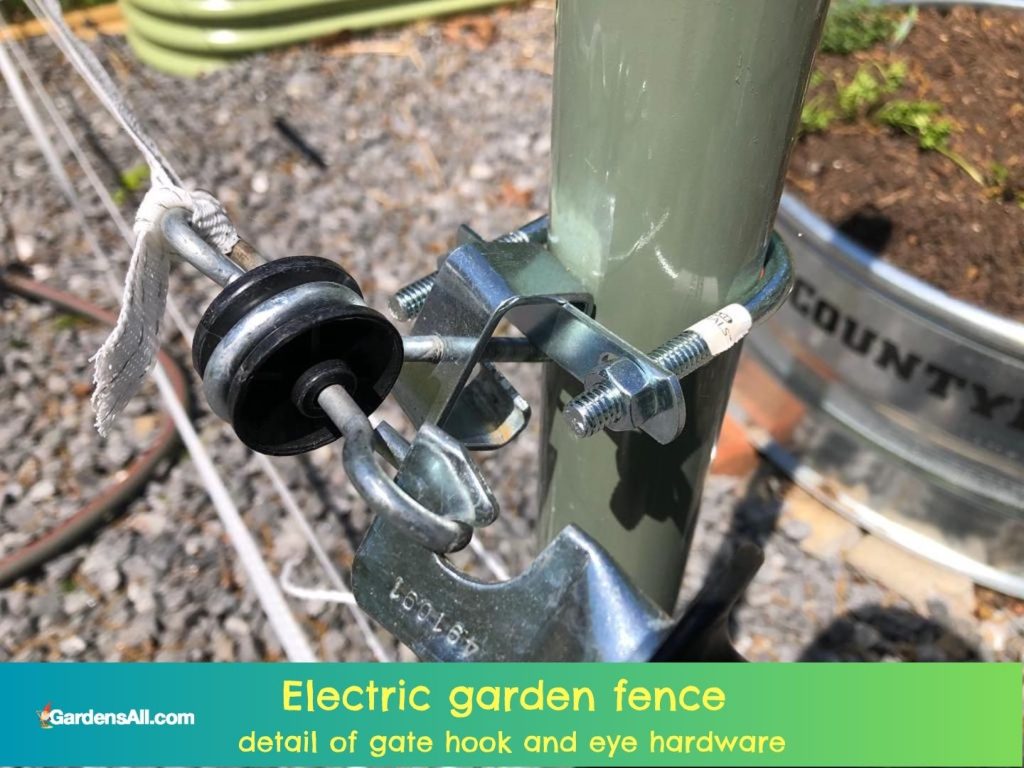
- Gate option: You may wish to install a gate to make it easier to access the garden with or without disabling the power source.
- Maintenance: Keep weeds away from the lines so as to keep the wires from grounding out.
Solar Electric Garden Fence Kit
An electric garden fence kit with a solar charger is designed to be completely self-sufficient. The solar panel will charge the battery during the day, and the battery will power the fence at night. This type of kit is ideal for those who do not have access to electricity in their garden or who want to reduce their energy consumption.
On the other hand, an electric garden fence kit without a solar charge will need to be connected to a power source. This type of kit is ideal for those who have access to electricity in their garden or who want a more powerful fence.
When choosing an electric garden fence it’s important to consider the size of your garden and the type of animals you want to keep out. A smaller garden may only need a low-voltage fence, while a larger garden may require a higher voltage fence to keep out larger animals.
Overall, an electric garden fence kit can be a great investment for anyone looking to protect their garden from unwanted pests. Just be sure to choose the kit that is right for your needs and preferences.
How to Install an Electric Fence With and Without Solar Charge
Installing an electric garden fence can help keep unwanted animals out of your garden and protect your plants. Since we have electricity right at the garden, we did not expend the additional ~$60 or so to install the solar battery, however it’s a great idea and we will likely add that in future.
Electric Fence Installation WITH Solar Charge:
Here are the general steps for installing an electric garden fence with and without a solar charge:
- SIZE: Determine the size of the area you want to fence off and choose a solar-powered electric fence kit that is appropriate for that size.
- LOCATION: Choose a location that is close to the garden and receives plenty of sunlight for optimal charging of the solar panel.
- GROUNDING: Install the grounding system. This involves driving a grounding rod into the ground and attaching it to the grounding terminal on the fence controller.
- SOLAR PANEL: Mount the solar panel in a location that receives plenty of sunlight. This may involve installing brackets on a nearby fence or post.
- BATTERY: Connect the solar panel to the battery and the fence controller using the provided wires.
- POSTS: Install the fence posts around the perimeter of the garden, and attach the fence wire to the posts.
- CONNECTIONS: Connect the fence wire to the fence controller, making sure to follow the manufacturer’s instructions.
- TEST: Turn on the fence controller and test the fence to make sure it is working properly.
Electric Fence Installation WITHOUT Solar Charge:
- SIZE: Determine the size of the area you want to fence off and choose an electric fence kit that is appropriate for that size.
- LOCATION: Choose a location for the fence controller that is close to the garden and has access to a power source.
- GROUNDING: Install the grounding system. This involves driving a grounding rod into the ground and attaching it to the grounding terminal on the fence controller.
- POSTS: Install the fence posts around the perimeter of the garden, and attach the fence wire to the posts.
- CONTROLLER: Connect the fence wire to the fence controller, making sure to follow the manufacturer’s instructions.
- POWER: Connect the fence controller to the power source using the provided wires.
- TEST: Turn on the fence controller and test the fence to make sure it is working properly.


In Conclusion
Overall, installing an electric fence can take a few hours and some ingenuity. With our first one, it was a learning curve of tweaks to adjust for coverage, and optimal configuration, especially since we didn’t have a simple rectangle.
Overall, we’ve found the electric fence system to be an effective way to protect your garden from unwanted animals.
So next, we plan to surround our fuyu persimmon trees with an electric fence because last year we lost most of them to raccoons, opossums and squirrels. After that, likely our blueberry patch as well, although the reflective tape has worked really well for deterring bird and so far, other furry critters haven’t bothered them.
Just be sure to follow the manufacturer’s instructions carefully. We haven’t tried other electric fence systems yet but we’re satisfied with the Hooyman electric garden fence.
Coleman created this video below to help give you an overview of our installation process.
I’m LeAura Alderson, a garden, herb and plant enthusiast with a passion for discovering the many edible and medicinal benefits of the plants all around us, including the weeds, while transforming the land through regenerative permaculture practice. I am also a writer, editor and media publisher (now mostly retired due to replacement by AI), but which now allows more time to build our regenerative permaculture homestead farm.