
When it’s time to start seedlings for the next growing season, space and lighting can be an issue. So we built a DIY PVC grow light stand for the knee nook of an unused desk in our office.
Most of our seedlings are started indoors. Even with a good south facing window, seedlings can get scrawny and leggy without enough good light. So having an indoor light source available can make a huge difference in the quality of early starters.
We’ve written more here about best LED grow lights.
Meanwhile, for you DIYers, here’s a helpful video on how to make your own, simple frame that’s easy to assemble and disassemble for storage.
PVC Grow Light Stand You Can Make
This grow light stand allows for two T-8 double light fixtures (4ft) which should light an 8 square foot grow space. Use regular T-8’s or the plant growth type.
We like the simplicity, modest cost, and practicality of this DIY light stand. Phil Crockett does a great job of showing the materials and explaining the process.
After that we made our own as well, which you can see further below.
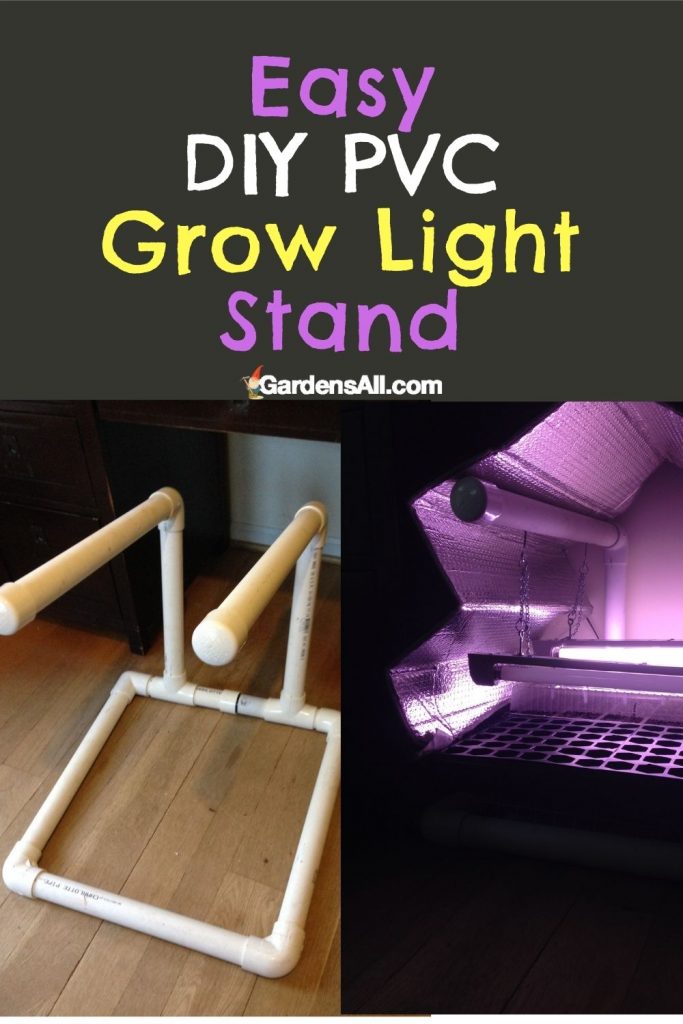
Small Under Desk PVC Grow Light Stand
The GardensAll crew had a situation with an unoccupied desk in our office and thought the knee space might work out as a cubby for a scaled-down grow light system as shown in the how-to video.
Practically all dimensions were cut in half, and we left key joints unglued just like the bigger model. We dry fit every piece to make sure of our measurements and then carefully did the gluing, starting with the shorter pieces.

T5 21 Inch Fluorescent Fixtures
A couple of T5 21 inch ft fluorescent fixtures were found with grow bulbs included. We removed the shades, and then the bulb so we could access the mounting slots. We did some modifications with the attachment using small eye bolts in the slots, and then 3/4 inch snap rings to clip on both ends of the hanging chains.

Short DIY PVC Grow Light Stand for Under a Desk or Cubby
Finding an old wire storage basket was a bonus that served to elevate the starter trays and allow the entire unit to slide in and out of the knee space area. You might not need to include this feature, but if so, practically any sort of sturdy grid or flat piece of material cut to size would suffice.
And this is how the finished project looks.

Leggy Plants Need More Light
More light bulbs would’ve been better because the first batch of seedlings got fairly leggy. To add more light, a reflective windshield sunscreen was tented over the structure.
We just used what we had on hand, but you can get the horticulture Mylar “fabric” in rolls as well. This helped but I would still opt for four lights instead of two. And so we learn as we go and grow.
Low Plant Stand Placed Over Heat Vent to Warm Seeds Starts
Once we were able to put our seedling flats outside for the day we removed the hanging lights and placed the short stand as an incubator resting above a floor heat vent.
The temps there hover between 77-82 degrees so it should get some action going soon with our tomato seeds. We mist the plants daily and keep the plastic lid on to prevent them from drying out from the air flow.

Simple and Successful DIY PVC Grow Light Stand
So yeah! We’re quite pleased with the “Mini-Me” version of the guys PVC set up and will likely add a couple more T5’s to boost the light intensity.
And here’s that link for the article on best grow lights. We’re also now making good use of indoor greenhouse, for starting more seedlings and the next level up in our growing journey was to build a cattle panel greenhouse which is working out very well.
So that’s our sequential journey to increasing our indoor growing space. Our next wish list item will be a larger year round greenhouse!
Overhead Grow Lights for Plant Towers
If you are more interested in a ready made “seed-to-harvest” indoor system, grow stands and plant towers might be a good fit. If you have some wiggle room in your budget, many people like the all-in-one composting plant tower for growing up to 50 plants in just 4 sq. ft. indoors or out.
For this you can use overhead grow lights. We’ve have a southern facing sunroom that’s a part of our living area, and we’ve placed grow lights in the over head lights there. Tower planters need more overhead lighting for better exposure to all sides and tiers of the tower, or else you need to rotate them.
G. Coleman Alderson is an entrepreneur, land manager, investor, gardener, and author of the novel, Mountain Whispers: Days Without Sun. Coleman holds an MS from Penn State where his thesis centered on horticulture, park planning, design, and maintenance. He’s a member of the Phi Kappa Phi Honor Society and a licensed building contractor for 27 years. “But nothing surpasses my 40 years of lessons from the field and garden. And in the garden, as in life, it’s always interesting because those lessons never end!” Coleman Alderson